Channel 与 Buffer
Java NIO 系统的核心在于:通道 (Channel) 和缓冲区 (Buffer)。通道表示打开到 IO 设备 (例如:文件、套接字) 的连接。若需要使用 NIO 系统,需要获取用于连接 IO 设备的通道 以及用于容纳数据的缓冲区。然后操作缓冲区,对数据进行处理
简而言之,通道负责传输,缓冲区负责存储
常见的 Channel 有以下四种,其中 FileChannel 主要用于文件传输,其余三种用于网络通信
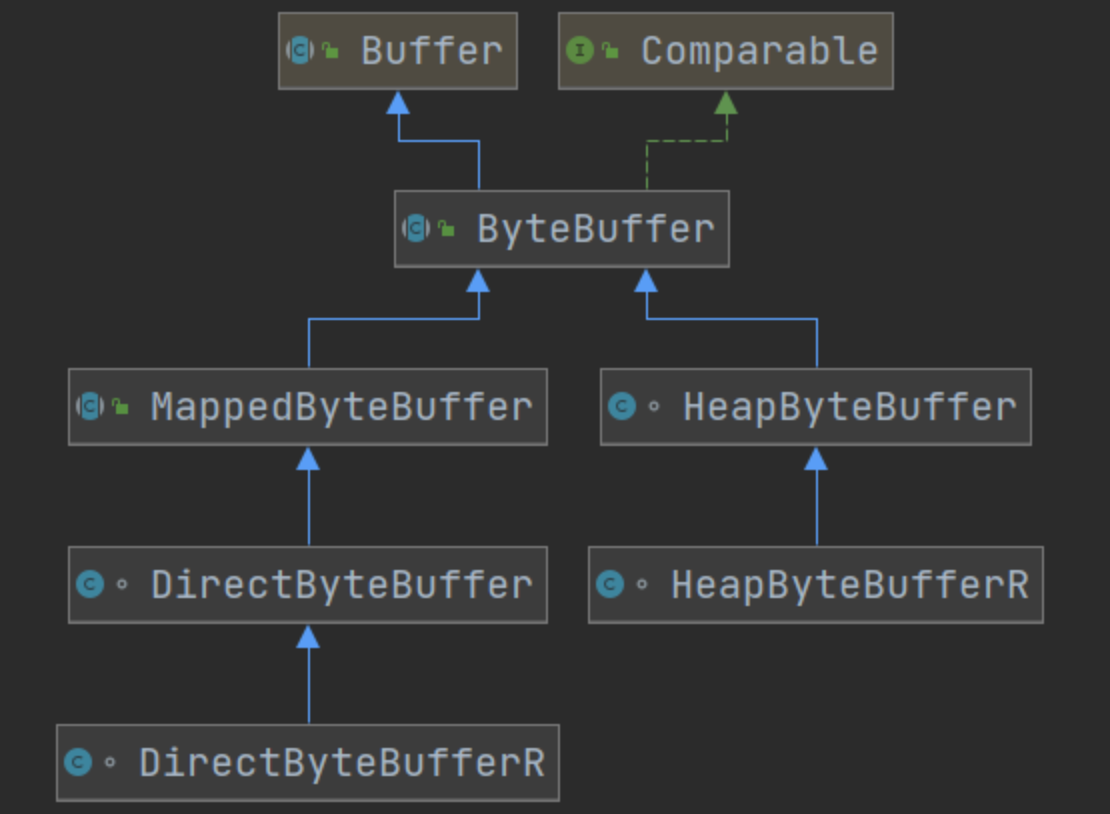
Buffer 有以下几种,其中使用较多的是 ByteBuffer
ByteBuffer
ShortBuffer
IntBuffer
LongBuffer
FloatBuffer
DoubleBuffer
CharBuffer
在使用 Selector 之前,处理 socket 连接还有以下两种方法
使用多线程技术
为每个连接分别开辟一个线程,分别去处理对应的 socket 连接
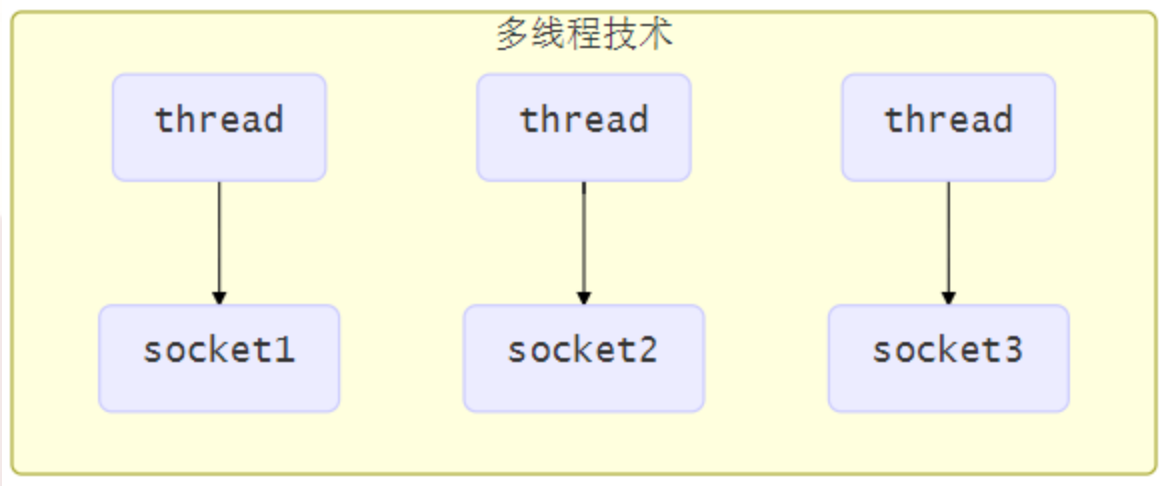
这种方法存在以下几个问题
使用线程池技术
使用线程池,让线程池中的线程去处理连接

这种方法存在以下几个问题
使用选择器
selector 的作用就是配合一个线程来管理多个 channel(fileChannel 因为是阻塞式的,所以无法使用 selector),,获取这些 channel 上发生的事件,这些 channel 工作在非阻塞模式下,当一个 channel 中没有执行任务时,可以去执行其他channel 中的任务。适合连接数多,但流量较少的场景
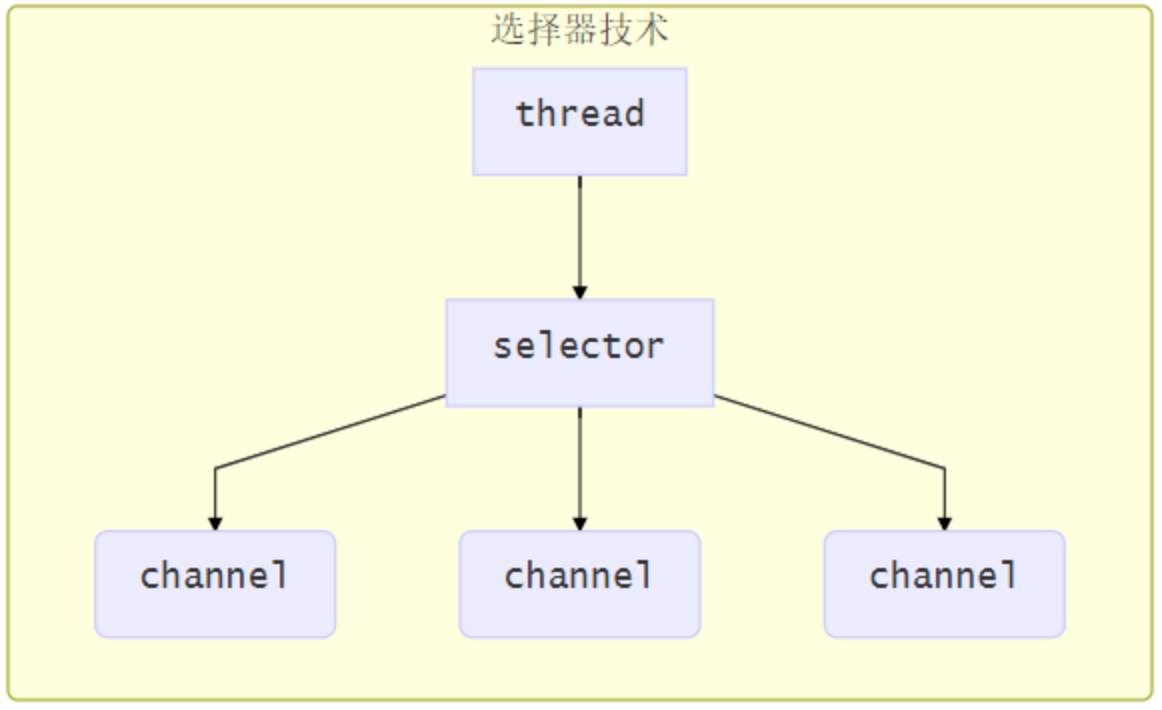
若事件未就绪,调用 selector 的 select () 方法会阻塞线程,直到 channel 发生了就绪事件。这些事件就绪后,select 方法就会返回这些事件交给 thread 来处理
向 buffer 写入数据,例如调用 channel.read (buffer)
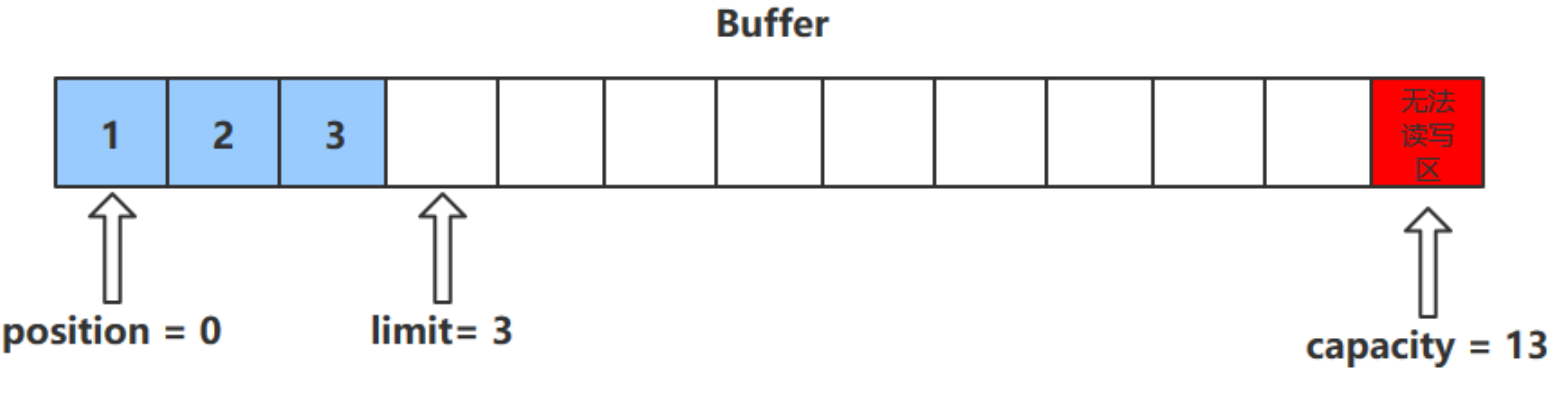
调用 flip () 切换至
读模式
从 buffer 读取数据,例如调用 buffer.get ()
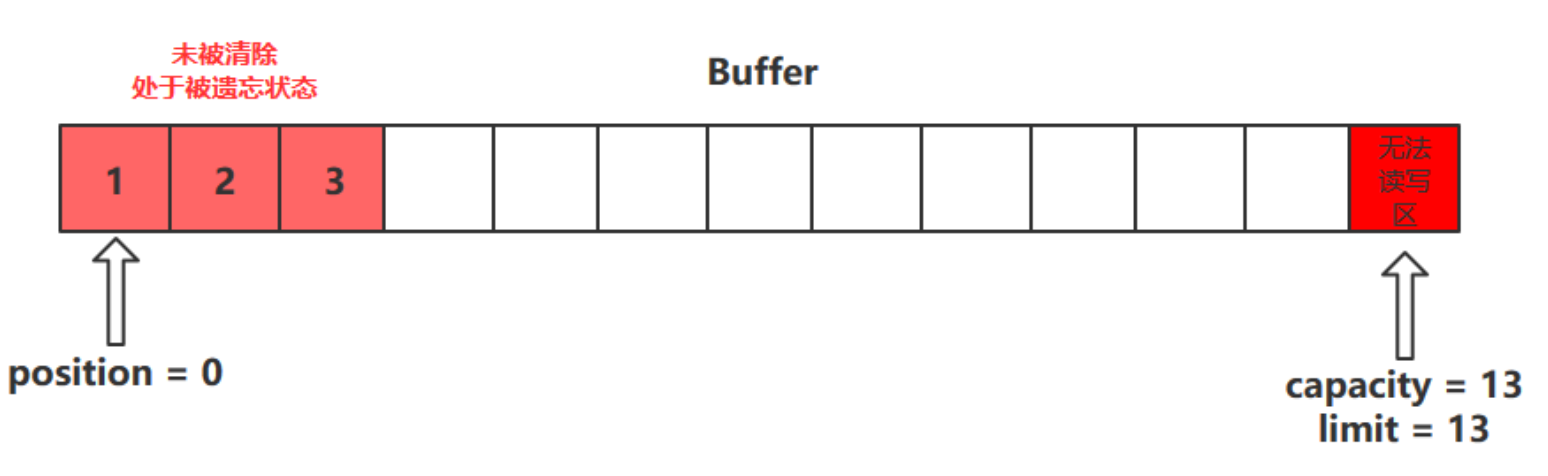
调用 clear () 或者 compact () 切换至
写模式
重复以上步骤
使用 ByteBuffer 读取文件中的内容
public class TestByteBuffer {
     public static void main(String[] args) {
        try (FileChannel channel = new FileInputStream("stu.txt").getChannel()){
            //给缓冲区 分配空间
            ByteBuffer buffer = ByteBuffer.allocate(10);
            int read = 0 ;
            StringBuilder builder = new StringBuilder();
            while ((read =channel.read(buffer))>0){
                //切换成 读模式 limit = position; position=0
                buffer.flip();
                while (buffer.hasRemaining()){
                    builder.append((char)buffer.get());
                }
                //清空字节数组 切换成 写模式 position=0 ;limit = capacity
                buffer.clear();
            }
            System.out.println(builder.toString());
        } catch (Exception e) {
            e.printStackTrace();
        } finally {

        }
    }
}
打印结果:
0123456789abcdef
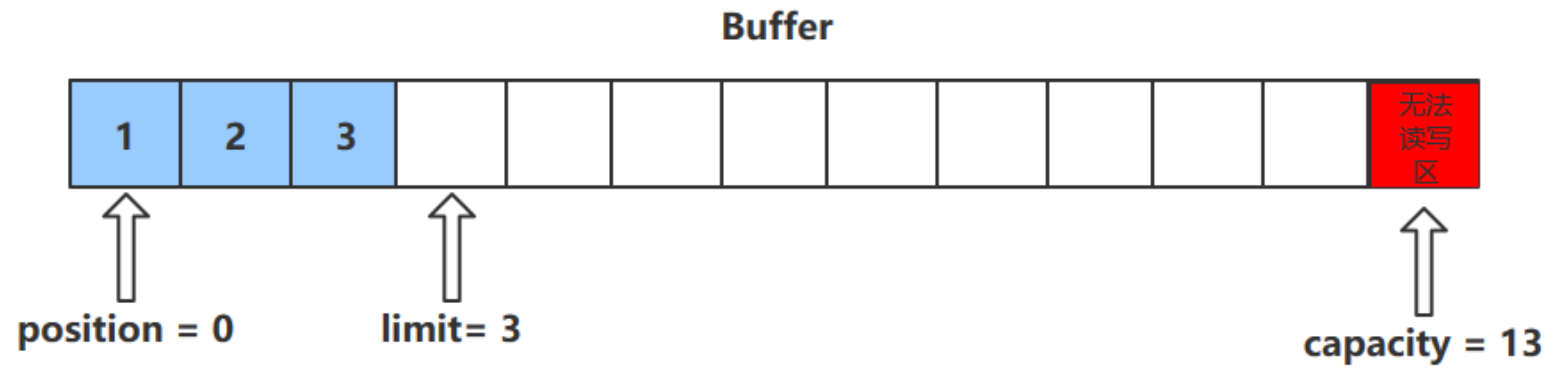
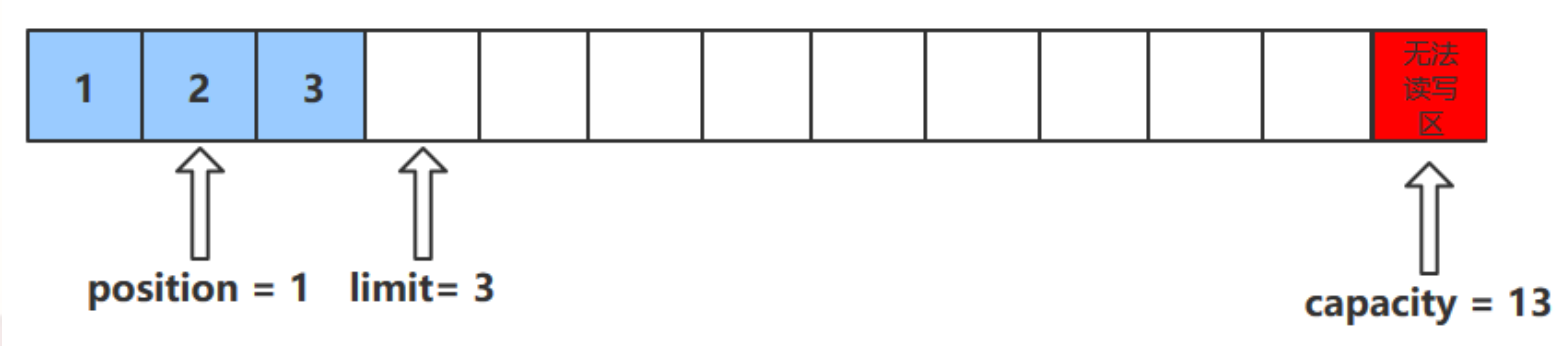
字节缓冲区的父类 Buffer 中有几个核心属性,如下
// Invariants: mark 以上四个属性必须满足以下要求
mark

此方法为 ByteBuffer 的方法,而不是 Buffer 的方法
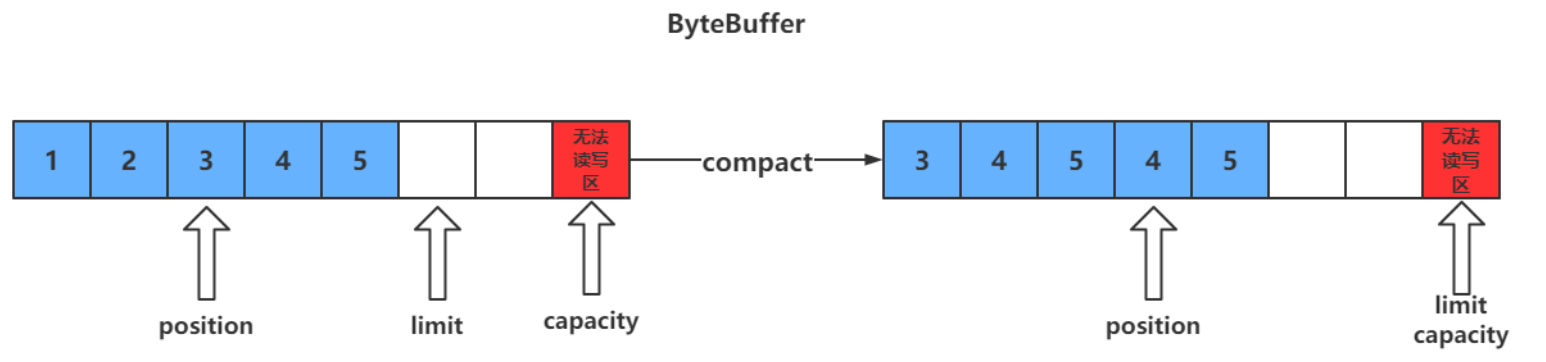
clear 只是对 position、limit、mark 进行重置,而 compact 在对 position 进行设置,以及 limit、mark 进行重置的同时,还涉及到数据在内存中拷贝(会调用 array)。所以 compact 比 clear 更耗性能。但 compact 能保存你未读取的数据,将新数据追加到为读取的数据之后;而 clear 则不行,若你调用了 clear,则未读取的数据就无法再读取到了
所以需要根据情况来判断使用哪种方法进行模式切换
需要先导入 netty 依赖
  io.netty
  netty-all
  4.1.51.Final
import java.nio.ByteBuffer;

import io.netty.util.internal.MathUtil;
import io.netty.util.internal.StringUtil;
import io.netty.util.internal.MathUtil.*;


public class ByteBufferUtil {
    private static final char[] BYTE2CHAR = new char[256];
    private static final char[] HEXDUMP_TABLE = new char[256 * 4];
    private static final String[] HEXPADDING = new String[16];
    private static final String[] HEXDUMP_ROWPREFIXES = new String[65536 >>> 4];
    private static final String[] BYTE2HEX = new String[256];
    private static final String[] BYTEPADDING = new String[16];

    static {
        final char[] DIGITS = "0123456789abcdef".toCharArray();
        for (int i = 0; i >> 4 & 0x0F];
            HEXDUMP_TABLE[(i = 0x7f) {
                BYTE2CHAR[i] = '.';
            } else {
                BYTE2CHAR[i] = (char) i;
            }
        }
    }

    /**
     * 打印所有内容
     * @param buffer
     */
    public static void debugAll(ByteBuffer buffer) {
        int oldlimit = buffer.limit();
        buffer.limit(buffer.capacity());
        StringBuilder origin = new StringBuilder(256);
        appendPrettyHexDump(origin, buffer, 0, buffer.capacity());
        System.out.println("+--------+-------------------- all ------------------------+----------------+");
        System.out.printf("position: [%d], limit: [%d]n", buffer.position(), oldlimit);
        System.out.println(origin);
        buffer.limit(oldlimit);
    }

    /**
     * 打印可读取内容
     * @param buffer
     */
    public static void debugRead(ByteBuffer buffer) {
        StringBuilder builder = new StringBuilder(256);
        appendPrettyHexDump(builder, buffer, buffer.position(), buffer.limit() - buffer.position());
        System.out.println("+--------+-------------------- read -----------------------+----------------+");
        System.out.printf("position: [%d], limit: [%d]n", buffer.position(), buffer.limit());
        System.out.println(builder);
    }

    private static void appendPrettyHexDump(StringBuilder dump, ByteBuffer buf, int offset, int length) {
        if (MathUtil.isOutOfBounds(offset, length, buf.capacity())) {
            throw new IndexOutOfBoundsException(
                    "expected: " + "0 >> 4;
        final int remainder = length & 0xF;

        // Dump the rows which have 16 bytes.
for (int row = 0; row public class TestByteBuffer {
public static void main(String[] args) {
ByteBuffer buffer = ByteBuffer.allocate(10);
// 向buffer中写入1个字节的数据
buffer.put((byte)97);
// 使用工具类,查看buffer状态
ByteBufferUtil.debugAll(buffer);
// 向buffer中写入4个字节的数据
buffer.put(new byte[]{98, 99, 100, 101});
ByteBufferUtil.debugAll(buffer);
// 获取数据
buffer.flip();
ByteBufferUtil.debugAll(buffer);
System.out.println(buffer.get());
System.out.println(buffer.get());
ByteBufferUtil.debugAll(buffer);
// 使用compact切换模式
buffer.compact();
ByteBufferUtil.debugAll(buffer);
// 再次写入
buffer.put((byte)102);
buffer.put((byte)103);
ByteBufferUtil.debugAll(buffer);
}
}
运行结果
// 向缓冲区写入了一个字节的数据,此时postition为1
+--------+-------------------- all ------------------------+----------------+
position: [1], limit: [10]
         +-------------------------------------------------+
         |  0  1  2  3  4  5  6  7  8  9  a  b  c  d  e  f |
+--------+-------------------------------------------------+----------------+
|00000000| 61 00 00 00 00 00 00 00 00 00                   |a.........      |
+--------+-------------------------------------------------+----------------+

// 向缓冲区写入四个字节的数据,此时position为5
+--------+-------------------- all ------------------------+----------------+
position: [5], limit: [10]
         +-------------------------------------------------+
         |  0  1  2  3  4  5  6  7  8  9  a  b  c  d  e  f |
+--------+-------------------------------------------------+----------------+
|00000000| 61 62 63 64 65 00 00 00 00 00                   |abcde.....      |
+--------+-------------------------------------------------+----------------+

// 调用flip切换模式,此时position为0,表示从第0个数据开始读取
+--------+-------------------- all ------------------------+----------------+
position: [0], limit: [5]
         +-------------------------------------------------+
         |  0  1  2  3  4  5  6  7  8  9  a  b  c  d  e  f |
+--------+-------------------------------------------------+----------------+
|00000000| 61 62 63 64 65 00 00 00 00 00                   |abcde.....      |
+--------+-------------------------------------------------+----------------+
// 读取两个字节的数据
97
98

// position变为2
+--------+-------------------- all ------------------------+----------------+
position: [2], limit: [5]
         +-------------------------------------------------+
         |  0  1  2  3  4  5  6  7  8  9  a  b  c  d  e  f |
+--------+-------------------------------------------------+----------------+
|00000000| 61 62 63 64 65 00 00 00 00 00                   |abcde.....      |
+--------+-------------------------------------------------+----------------+

// 调用compact切换模式,此时position及其后面的数据被压缩到ByteBuffer前面去了
// 此时position为3,会覆盖之前的数据
+--------+-------------------- all ------------------------+----------------+
position: [3], limit: [10]
         +-------------------------------------------------+
         |  0  1  2  3  4  5  6  7  8  9  a  b  c  d  e  f |
+--------+-------------------------------------------------+----------------+
|00000000| 63 64 65 64 65 00 00 00 00 00                   |cdede.....      |
+--------+-------------------------------------------------+----------------+

// 再次写入两个字节的数据,之前的 0x64 0x65 被覆盖
+--------+-------------------- all ------------------------+----------------+
position: [5], limit: [10]
         +-------------------------------------------------+
         |  0  1  2  3  4  5  6  7  8  9  a  b  c  d  e  f |
+--------+-------------------------------------------------+----------------+
|00000000| 63 64 65 66 67 00 00 00 00 00                   |cdefg.....      |
+--------+-------------------------------------------------+----------------+
编码:字符串调用 getByte 方法获得 byte 数组,将 byte 数组放入 ByteBuffer 中
解码:先调用 ByteBuffer 的 flip 方法,然后通过 StandardCharsets 的 decoder 方法解码
public class Translate {
    public static void main(String[] args) {
        // 准备两个字符串
        String str1 = "hello";
        String str2 = "";


        ByteBuffer buffer1 = ByteBuffer.allocate(16);
        // 通过字符串的getByte方法获得字节数组,放入缓冲区中
        buffer1.put(str1.getBytes());
        ByteBufferUtil.debugAll(buffer1);

        // 将缓冲区中的数据转化为字符串
        // 切换模式
        buffer1.flip();

        // 通过StandardCharsets解码,获得CharBuffer,再通过toString获得字符串
        str2 = StandardCharsets.UTF_8.decode(buffer1).toString();
        System.out.println(str2);
        ByteBufferUtil.debugAll(buffer1);
    }
}
运行结果
+--------+-------------------- all ------------------------+----------------+
position: [5], limit: [16]
         +-------------------------------------------------+
         |  0  1  2  3  4  5  6  7  8  9  a  b  c  d  e  f |
+--------+-------------------------------------------------+----------------+
|00000000| 68 65 6c 6c 6f 00 00 00 00 00 00 00 00 00 00 00 |hello...........|
+--------+-------------------------------------------------+----------------+
hello
+--------+-------------------- all ------------------------+----------------+
position: [5], limit: [5]
         +-------------------------------------------------+
         |  0  1  2  3  4  5  6  7  8  9  a  b  c  d  e  f |
+--------+-------------------------------------------------+----------------+
|00000000| 68 65 6c 6c 6f 00 00 00 00 00 00 00 00 00 00 00 |hello...........|
+--------+-------------------------------------------------+----------------+
编码:通过 StandardCharsets 的 encode 方法获得 ByteBuffer,此时获得的 ByteBuffer 为读模式,无需通过 flip 切换模式
解码:通过 StandardCharsets 的 decoder 方法解码
public class Translate {
    public static void main(String[] args) {
        // 准备两个字符串
        String str1 = "hello";
        String str2 = "";

        // 通过StandardCharsets的encode方法获得ByteBuffer
        // 此时获得的ByteBuffer为读模式,无需通过flip切换模式
        ByteBuffer buffer1 = StandardCharsets.UTF_8.encode(str1);
        ByteBufferUtil.debugAll(buffer1);

        // 将缓冲区中的数据转化为字符串
        // 通过StandardCharsets解码,获得CharBuffer,再通过toString获得字符串
        str2 = StandardCharsets.UTF_8.decode(buffer1).toString();
        System.out.println(str2);
        ByteBufferUtil.debugAll(buffer1);
    }
}
运行结果
+--------+-------------------- all ------------------------+----------------+
position: [0], limit: [5]
         +-------------------------------------------------+
         |  0  1  2  3  4  5  6  7  8  9  a  b  c  d  e  f |
+--------+-------------------------------------------------+----------------+
|00000000| 68 65 6c 6c 6f                                  |hello           |
+--------+-------------------------------------------------+----------------+
hello
+--------+-------------------- all ------------------------+----------------+
position: [5], limit: [5]
         +-------------------------------------------------+
         |  0  1  2  3  4  5  6  7  8  9  a  b  c  d  e  f |
+--------+-------------------------------------------------+----------------+
|00000000| 68 65 6c 6c 6f                                  |hello           |
+--------+-------------------------------------------------+----------------+
编码:字符串调用 getByte () 方法获得字节数组,将字节数组传给 ByteBuffer 的 wrap () 方法,通过该方法获得 ByteBuffer。同样无需调用 flip 方法切换为读模式
解码:通过 StandardCharsets 的 decoder 方法解码
public class Translate {
    public static void main(String[] args) {
        // 准备两个字符串
        String str1 = "hello";
        String str2 = "";

        // 通过StandardCharsets的encode方法获得ByteBuffer
        // 此时获得的ByteBuffer为读模式,无需通过flip切换模式
        ByteBuffer buffer1 = ByteBuffer.wrap(str1.getBytes());
        ByteBufferUtil.debugAll(buffer1);

        // 将缓冲区中的数据转化为字符串
        // 通过StandardCharsets解码,获得CharBuffer,再通过toString获得字符串
        str2 = StandardCharsets.UTF_8.decode(buffer1).toString();
        System.out.println(str2);
        ByteBufferUtil.debugAll(buffer1);
    }
}
运行结果
+--------+-------------------- all ------------------------+----------------+
position: [0], limit: [5]
         +-------------------------------------------------+
         |  0  1  2  3  4  5  6  7  8  9  a  b  c  d  e  f |
+--------+-------------------------------------------------+----------------+
|00000000| 68 65 6c 6c 6f                                  |hello           |
+--------+-------------------------------------------------+----------------+
hello
+--------+-------------------- all ------------------------+----------------+
position: [5], limit: [5]
         +-------------------------------------------------+
         |  0  1  2  3  4  5  6  7  8  9  a  b  c  d  e  f |
+--------+-------------------------------------------------+----------------+
|00000000| 68 65 6c 6c 6f                                  |hello           |
+--------+-------------------------------------------------+----------------+
网络上有多条数据发送给服务端,数据之间使用 n 进行分隔
但由于某种原因这些数据在接收时,被进行了重新组合,例如原始数据有 3 条为
变成了下面的两个 byteBuffer (粘包,半包)
粘包
发送方 在发送数据时,并不是一条一条地发送数据,而是将数据整合在一起,当数据达到一定的数量后再一起发送。这就会导致多条信息被放在一个缓冲区中被一起发送出去
半包
接收方 的缓冲区的大小是有限的,当接收方的缓冲区满了以后,就需要将信息截断,等缓冲区空了以后再继续放入数据。这就会发生一段完整的数据最后被截断的现象
通过 get (index) 方法遍历 ByteBuffer,遇到分隔符时进行处理。
注意
:get (index) 不会改变 position 的值
调用 compact 方法切换模式,因为缓冲区中可能还有未读的数据
public class ByteBufferDemo {
    public static void main(String[] args) {
        ByteBuffer buffer = ByteBuffer.allocate(32);
        // 模拟粘包+半包
        buffer.put("Hello,worldnI'm NyimanHo".getBytes());
        // 调用split函数处理
        split(buffer);
        buffer.put("w are you?n".getBytes());
        split(buffer);
    }

    private static void split(ByteBuffer buffer) {
        // 切换为读模式
        buffer.flip();
        for(int i = 0; i
运行结果
+--------+-------------------- all ------------------------+----------------+
position: [12], limit: [12]
         +-------------------------------------------------+
         |  0  1  2  3  4  5  6  7  8  9  a  b  c  d  e  f |
+--------+-------------------------------------------------+----------------+
|00000000| 48 65 6c 6c 6f 2c 77 6f 72 6c 64 0a             |Hello,world.    |
+--------+-------------------------------------------------+----------------+
+--------+-------------------- all ------------------------+----------------+
position: [10], limit: [10]
         +-------------------------------------------------+
         |  0  1  2  3  4  5  6  7  8  9  a  b  c  d  e  f |
+--------+-------------------------------------------------+----------------+
|00000000| 49 27 6d 20 4e 79 69 6d 61 0a                   |I'm Nyima.      |
+--------+-------------------------------------------------+----------------+
+--------+-------------------- all ------------------------+----------------+
position: [13], limit: [13]
         +-------------------------------------------------+
         |  0  1  2  3  4  5  6  7  8  9  a  b  c  d  e  f |
+--------+-------------------------------------------------+----------------+
|00000000| 48 6f 77 20 61 72 65 20 79 6f 75 3f 0a          |How are you?.   |
+--------+-------------------------------------------------+----------------+
FileChannel 只能在阻塞模式下工作,所以无法搭配 Selector
不能直接打开 FileChannel,必须通过 FileInputStream、FileOutputStream 或者 RandomAccessFile 来获取 FileChannel,它们都有 getChannel 方法
通过 FileInputStream 获取 channel,通过 read 方法将数据写入到 ByteBuffer 中
read 方法的返回值表示读到了多少字节,若读到了文件末尾则返回 - 1
int readBytes = channel.read(buffer);
可根据返回值判断是否读取完毕
while(channel.read(buffer) > 0) {
    // 进行对应操作
    ...
}
因为 channel 也是有大小的,所以 write 方法并不能保证一次将 buffer 中的内容全部写入 channel。必须需要按照以下规则进行写入
// 通过hasRemaining()方法查看缓冲区中是否还有数据未写入到通道中
while(buffer.hasRemaining()) {
	channel.write(buffer);
}
通道需要 close,一般情况通过 try-with-resource 进行关闭,最好使用以下方法获取 strea 以及 channel,避免某些原因使得资源未被关闭
public class TestChannel {
    public static void main(String[] args) throws IOException {
        try (FileInputStream fis = new FileInputStream("stu.txt");
             FileOutputStream fos = new FileOutputStream("student.txt");
             FileChannel inputChannel = fis.getChannel();
             FileChannel outputChannel = fos.getChannel()) {

            // 执行对应操作
            ...

        }
    }
}
position
channel 也拥有一个保存读取数据位置的属性,即 position
long pos = channel.position();
可以通过 position (int pos) 设置 channel 中 position 的值
long newPos = ...;
channel.position(newPos);
设置当前位置时,如果设置为文件的末尾
操作系统出于性能的考虑,会将数据缓存,不是立刻写入磁盘,而是等到缓存满了以后将所有数据一次性的写入磁盘。可以调用 force(true) 方法将文件内容和元数据(文件的权限等信息)立刻写入磁盘
使用 transferTo 方法可以快速、高效地将一个 channel 中的数据传输到另一个 channel 中,但一次只能传输 2G 的内容
transferTo 底层使用了零拷贝技术
public class TestChannel {
    public static void main(String[] args){
        try (FileInputStream fis = new FileInputStream("stu.txt");
             FileOutputStream fos = new FileOutputStream("student.txt");
             FileChannel inputChannel = fis.getChannel();
             FileChannel outputChannel = fos.getChannel()) {
            // 参数:inputChannel的起始位置,传输数据的大小,目的channel
            // 返回值为传输的数据的字节数
            // transferTo一次只能传输2G的数据
            inputChannel.transferTo(0, inputChannel.size(), outputChannel);
        } catch (IOException e) {
            e.printStackTrace();
        }
    }
}
当传输的文件大于 2G 时,需要使用以下方法进行多次传输
public class TestChannel {
    public static void main(String[] args){
        try (FileInputStream fis = new FileInputStream("stu.txt");
             FileOutputStream fos = new FileOutputStream("student.txt");
             FileChannel inputChannel = fis.getChannel();
             FileChannel outputChannel = fos.getChannel()) {
            long size = inputChannel.size();
            long capacity = inputChannel.size();
            // 分多次传输
            while (capacity > 0) {
                // transferTo返回值为传输了的字节数
                capacity -= inputChannel.transferTo(size-capacity, capacity, outputChannel);
            }
        } catch (IOException e) {
            e.printStackTrace();
        }
    }
}
Path source = Paths.get("1.txt"); // 相对路径 不带盘符 使用 user.dir 环境变量来定位 1.txt

Path source = Paths.get("d:\1.txt"); // 绝对路径 代表了  d:1.txt 反斜杠需要转义

Path source = Paths.get("d:/1.txt"); // 绝对路径 同样代表了  d:1.txt

Path projects = Paths.get("d:\data", "projects"); // 代表了  d:dataprojects
例如目录结构如下
d:
	|- data
		|- projects
			|- a
			|- b
代码
Path path = Paths.get("d:\data\projects\a\..\b");
System.out.println(path);
System.out.println(path.normalize()); // 正常化路径 会去除 . 以及 ..
输出结果为
d:dataprojectsa..b
d:dataprojectsb
检查文件是否存在
Path path = Paths.get("helloword/data.txt");
System.out.println(Files.exists(path));
创建一级目录
Path path = Paths.get("helloword/d1");
Files.createDirectory(path);
创建多级目录用
Path path = Paths.get("helloword/d1/d2");
Files.createDirectories(path);
Path source = Paths.get("helloword/data.txt");
Path target = Paths.get("helloword/target.txt");

Files.copy(source, target);
如果希望用 source 覆盖 掉 target,需要用 StandardOption 来控制
Files.copy(source, target, StandardOption.REPLACE_EXISTING);
移动文件
Path source = Paths.get("helloword/data.txt");
Path target = Paths.get("helloword/data.txt");

Files.move(source, target, StandardOption.ATOMIC_MOVE);
删除文件
Path target = Paths.get("helloword/target.txt");

Files.delete(target);
删除目录
Path target = Paths.get("helloword/d1");

Files.delete(target);
可以使用 Files 工具类中的 walkFileTree (Path, FileVisitor) 方法,其中需要传入两个参数
Path:文件起始路径
FileVisitor:文件访问器,
使用访问者模式
接口的实现类
SimpleFileVisitor
有四个方法
public class TestFiles {
    public static void main(String[] args) throws IOException {
        AtomicInteger ditCount = new AtomicInteger();
        AtomicInteger fileCount = new AtomicInteger();

        Files.walkFileTree(Paths.get("D:\Program Files\jdk7"),new SimpleFileVisitor(){
            @Override
            public FileVisitResult preVisitDirectory(Path dir, BasicFileAttributes attrs) throws IOException {
                System.err.println("=====>"+dir);
                ditCount.incrementAndGet();
                return super.preVisitDirectory(dir, attrs);
            }

            @Override
            public FileVisitResult visitFile(Path file, BasicFileAttributes attrs) throws IOException {
                System.out.println("=====>"+file);
                fileCount.incrementAndGet();
                return super.visitFile(file, attrs);
            }
        });
        System.out.println("dir count :"+ditCount);
        System.out.println("file count :"+fileCount);
    }
}
运行结果如下
...
=====>D:Program Filesjdk7jre7libziSystemVEST5EDT
=====>D:Program Filesjdk7jre7libziSystemVHST10
=====>D:Program Filesjdk7jre7libziSystemVMST7
=====>D:Program Filesjdk7jre7libziSystemVMST7MDT
=====>D:Program Filesjdk7jre7libziSystemVPST8
=====>D:Program Filesjdk7jre7libziSystemVPST8PDT
=====>D:Program Filesjdk7jre7libziSystemVYST9
=====>D:Program Filesjdk7jre7libziSystemVYST9YDT
=====>D:Program Filesjdk7jre7libziWET
=====>D:Program Filesjdk7jre7libziZoneInfoMappings
=====>D:Program Filesjdk7jre7LICENSE
=====>D:Program Filesjdk7jre7README.txt
=====>D:Program Filesjdk7jre7release
=====>D:Program Filesjdk7jre7THIRDPARTYLICENSEREADME-JAVAFX.txt
=====>D:Program Filesjdk7jre7THIRDPARTYLICENSEREADME.txt
=====>D:Program Filesjdk7jre7Welcome.html
dir count :183
file count :2437
本文由
传智教育博学谷教研团队发布。如果本文对您有帮助,欢迎
关注和点赞;如果您有任何建议也可留言评论或私信,您的支持是我坚持创作的动力。转载请注明出处!
 登录查看全部
参与评论
手机查看
返回顶部