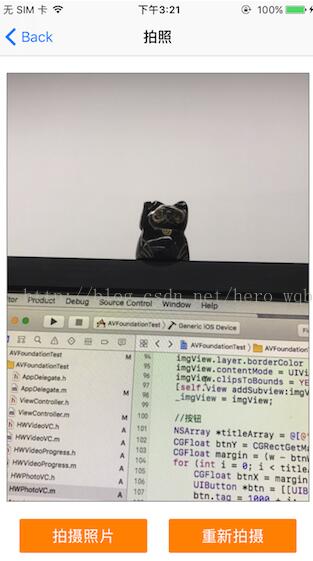
用系统自带的视听媒体的框架,AVFoundation实现照片拍摄。相比UIKit框架(UIImagePickerController高度封装),AVFoundation框架让开发者有更大的发挥空间。
首先看一下效果图:

下面贴上核心控制器代码:
#import "HWPhotoVC.h"
#import <AVFoundation/AVFoundation.h>

@interface HWPhotoVC ()

@property (nonatomic, strong) AVCaptureSession *captureSession;//负责输入和输出设备之间的数据传递
@property (nonatomic, strong) AVCaptureDeviceInput *captureDeviceInput;//负责从AVCaptureDevice获得输入数据
@property (nonatomic, strong) AVCaptureStillImageOutput *captureStillImageOutput;//照片输出流
@property (nonatomic, strong) AVCaptureVideoPreviewLayer *captureVideoPreviewLayer;//相机拍摄预览图层
@property (nonatomic, weak) UIView *containerView;//内容视图
@property (nonatomic, weak) UIImageView *focusCursor;//聚焦按钮
@property (nonatomic, weak) UIImageView *imgView;//拍摄照片

@end

@implementation HWPhotoVC

- (void)viewDidLoad {
 [super viewDidLoad];

 self.navigationItem.title = @"拍照";
 self.view.backgroundColor = [UIColor whiteColor];

 //创建控件
 [self creatControl];
}

- (void)viewWillAppear:(BOOL)animated
{
 [super viewWillAppear:animated];

 //初始化信息
 [self initPhotoInfo];
}

- (void)viewDidAppear:(BOOL)animated
{
 [super viewDidAppear:animated];

 [self.captureSession startRunning];
}

- (void)viewDidDisappear:(BOOL)animated
{
 [super viewDidDisappear:animated];

 [self.captureSession stopRunning];
}

- (void)creatControl
{
 CGFloat btnW = 150.f;
 CGFloat btnH = 40.f;
 CGFloat marginY = 20.f;
 CGFloat w = [UIScreen mainScreen].bounds.size.width;
 CGFloat h = [UIScreen mainScreen].bounds.size.height;

 //内容视图
 CGFloat containerViewH = h - 64 - btnH - marginY * 3;
 UIView *containerView = [[UIView alloc] initWithFrame:CGRectMake(10, 64 + marginY, w - 20, containerViewH)];
 containerView.backgroundColor = [UIColor whiteColor];
 containerView.layer.borderWidth = 1.f;
 containerView.layer.borderColor = [[UIColor grayColor] CGColor];
 [self.view addSubview:containerView];
 _containerView = containerView;

 //摄像头切换按钮
 CGFloat cameraSwitchBtnW = 50.f;
 CGFloat cameraSwitchBtnMargin = 10.f;
 UIButton *cameraSwitchBtn = [[UIButton alloc] initWithFrame:CGRectMake(containerView.bounds.size.width - cameraSwitchBtnW - cameraSwitchBtnMargin, 64 + marginY + cameraSwitchBtnMargin, cameraSwitchBtnW, cameraSwitchBtnW)];
 [cameraSwitchBtn setImage:[UIImage imageNamed:@"camera_switch"] forState:UIControlStateNormal];
 [cameraSwitchBtn addTarget:self action:@selector(cameraSwitchBtnOnClick) forControlEvents:UIControlEventTouchUpInside];
 [self.view addSubview:cameraSwitchBtn];

 //聚焦图片
 UIImageView *focusCursor = [[UIImageView alloc] initWithFrame:CGRectMake(50, 50, 75, 75)];
 focusCursor.alpha = 0;
 focusCursor.image = [UIImage imageNamed:@"camera_focus_red"];
 [containerView addSubview:focusCursor];
 _focusCursor = focusCursor;

 //拍摄照片容器
 UIImageView *imgView = [[UIImageView alloc] initWithFrame:containerView.frame];
 imgView.hidden = YES;
 imgView.layer.borderWidth = 1.f;
 imgView.layer.borderColor = [[UIColor grayColor] CGColor];
 imgView.contentMode = UIViewContentModeScaleAspectFill;
 imgView.clipsToBounds = YES;
 [self.view addSubview:imgView];
 _imgView = imgView;

 //按钮
 NSArray *titleArray = @[@"拍摄照片", @"重新拍摄"];
 CGFloat btnY = CGRectGetMaxY(containerView.frame) + marginY;
 CGFloat margin = (w - btnW * titleArray.count) / (titleArray.count + 1);
 for (int i = 0; i < titleArray.count; i++) {
  CGFloat btnX = margin + (margin + btnW) * i;
  UIButton *btn = [[UIButton alloc] initWithFrame:CGRectMake(btnX, btnY, btnW, btnH)];
  btn.tag = 1000 + i;
  [btn setTitle:titleArray[i] forState:UIControlStateNormal];
  btn.backgroundColor = [UIColor orangeColor];
  btn.layer.cornerRadius = 2.0f;
  btn.layer.masksToBounds = YES;
  if (i == 1) {
   btn.hidden = YES;
  }
  [btn addTarget:self action:@selector(btnOnClick:) forControlEvents:UIControlEventTouchUpInside];
  [self.view addSubview:btn];
 }
}

- (void)initPhotoInfo
{
 //初始化会话
 _captureSession = [[AVCaptureSession alloc] init];

 //设置分辨率
 if ([_captureSession canSetSessionPreset:AVCaptureSessionPreset1280x720]) {
  _captureSession.sessionPreset = AVCaptureSessionPreset1280x720;
 }

 //获得输入设备,取得后置摄像头
 AVCaptureDevice *captureDevice = [self getCameraDeviceWithPosition:AVCaptureDevicePositionBack];
 if (!captureDevice) {
  NSLog(@"取得后置摄像头时出现问题");
  return;
 }

 NSError *error = nil;
 //根据输入设备初始化设备输入对象,用于获得输入数据
 _captureDeviceInput = [[AVCaptureDeviceInput alloc]initWithDevice:captureDevice error:&error];
 if (error) {
  NSLog(@"取得设备输入对象时出错,错误原因:%@", error.localizedDescription);
  return;
 }

 //初始化设备输出对象,用于获得输出数据
 _captureStillImageOutput = [[AVCaptureStillImageOutput alloc] init];
 NSDictionary *outputSettings = @{AVVideoCodecKey:AVVideoCodecJPEG};
 //输出设置
 [_captureStillImageOutput setOutputSettings:outputSettings];

 //将设备输入添加到会话中
 if ([_captureSession canAddInput:_captureDeviceInput]) {
  [_captureSession addInput:_captureDeviceInput];
 }

 //将设备输出添加到会话中
 if ([_captureSession canAddOutput:_captureStillImageOutput]) {
  [_captureSession addOutput:_captureStillImageOutput];
 }

 //创建视频预览层,用于实时展示摄像头状态
 _captureVideoPreviewLayer = [[AVCaptureVideoPreviewLayer alloc] initWithSession:self.captureSession];

 //摄像头方向
 AVCaptureConnection *captureConnection = [self.captureVideoPreviewLayer connection];
 captureConnection.videoOrientation = AVCaptureVideoOrientationPortrait;

 CALayer *layer = _containerView.layer;
 layer.masksToBounds = YES;

 _captureVideoPreviewLayer.frame = layer.bounds;
 //填充模式
 _captureVideoPreviewLayer.videoGravity = AVLayerVideoGravityResizeAspectFill;
 //将视频预览层添加到界面中
 [layer insertSublayer:_captureVideoPreviewLayer below:self.focusCursor.layer];

 [self addNotificationToCaptureDevice:captureDevice];
 [self addGenstureRecognizer];
}

- (void)btnOnClick:(UIButton *)btn
{
 if (btn.tag == 1000) {
  //拍摄照片
  [self photoBtnOnClick];

 }else if (btn.tag == 1001) {
  //重新拍摄
  [self resetPhoto];
 }
}

#pragma mark 拍照
- (void)photoBtnOnClick
{
 //根据设备输出获得连接
 AVCaptureConnection *captureConnection = [self.captureStillImageOutput connectionWithMediaType:AVMediaTypeVideo];
 captureConnection.videoOrientation = AVCaptureVideoOrientationPortrait;

 //根据连接取得设备输出的数据
 [self.captureStillImageOutput captureStillImageAsynchronouslyFromConnection:captureConnection completionHandler:^(CMSampleBufferRef imageDataSampleBuffer, NSError *error) {
  if (imageDataSampleBuffer) {
   NSData *imageData = [AVCaptureStillImageOutput jpegStillImageNSDataRepresentation:imageDataSampleBuffer];
   UIImage *image = [UIImage imageWithData:imageData];
   _imgView.image = image;
   _imgView.hidden = NO;
  }
 }];

 UIButton *btn = (UIButton *)[self.view viewWithTag:1001];
 btn.hidden = NO;
}

//重新拍摄
- (void)resetPhoto
{
 _imgView.hidden = YES;
 UIButton *btn = (UIButton *)[self.view viewWithTag:1001];
 btn.hidden = YES;
}

#pragma mark - 通知
//给输入设备添加通知
- (void)addNotificationToCaptureDevice:(AVCaptureDevice *)captureDevice
{
 //注意添加区域改变捕获通知必须首先设置设备允许捕获
 [self changeDeviceProperty:^(AVCaptureDevice *captureDevice) {
  captureDevice.subjectAreaChangeMonitoringEnabled = YES;
 }];

 //捕获区域发生改变
 [[NSNotificationCenter defaultCenter] addObserver:self selector:@selector(areaChange:) name:AVCaptureDeviceSubjectAreaDidChangeNotification object:captureDevice];
}

- (void)removeNotificationFromCaptureDevice:(AVCaptureDevice *)captureDevice
{
 [[NSNotificationCenter defaultCenter] removeObserver:self name:AVCaptureDeviceSubjectAreaDidChangeNotification object:captureDevice];
}

//移除所有通知
- (void)removeNotification
{
 [[NSNotificationCenter defaultCenter] removeObserver:self];
}

//设备连接成功
- (void)deviceConnected:(NSNotification *)notification
{
 NSLog(@"设备已连接...");
}

//设备连接断开
- (void)deviceDisconnected:(NSNotification *)notification
{
 NSLog(@"设备已断开.");
}

//捕获区域改变
- (void)areaChange:(NSNotification *)notification
{
 NSLog(@"捕获区域改变...");
}

#pragma mark - 私有方法
//取得指定位置的摄像头
- (AVCaptureDevice *)getCameraDeviceWithPosition:(AVCaptureDevicePosition )position
{
 NSArray *cameras = [AVCaptureDevice devicesWithMediaType:AVMediaTypeVideo];
 for (AVCaptureDevice *camera in cameras) {
  if ([camera position] == position) {
   return camera;
  }
 }

 return nil;
}

#pragma mark 切换前后摄像头
- (void)cameraSwitchBtnOnClick
{
 AVCaptureDevice *currentDevice = [self.captureDeviceInput device];
 AVCaptureDevicePosition currentPosition = [currentDevice position];
 [self removeNotificationFromCaptureDevice:currentDevice];

 AVCaptureDevice *toChangeDevice;
 AVCaptureDevicePosition toChangePosition = AVCaptureDevicePositionFront;
 if (currentPosition == AVCaptureDevicePositionUnspecified || currentPosition == AVCaptureDevicePositionFront) {
  toChangePosition = AVCaptureDevicePositionBack;
 }
 toChangeDevice = [self getCameraDeviceWithPosition:toChangePosition];
 [self addNotificationToCaptureDevice:toChangeDevice];
 //获得要调整的设备输入对象
 AVCaptureDeviceInput *toChangeDeviceInput = [[AVCaptureDeviceInput alloc] initWithDevice:toChangeDevice error:nil];

 //改变会话的配置前一定要先开启配置,配置完成后提交配置改变
 [self.captureSession beginConfiguration];
 //移除原有输入对象
 [self.captureSession removeInput:self.captureDeviceInput];
 //添加新的输入对象
 if ([self.captureSession canAddInput:toChangeDeviceInput]) {
  [self.captureSession addInput:toChangeDeviceInput];
  self.captureDeviceInput = toChangeDeviceInput;
 }
 //提交会话配置
 [self.captureSession commitConfiguration];
}

//改变设备属性的统一操作方法
- (void)changeDeviceProperty:(void (^)(AVCaptureDevice *))propertyChange
{
 AVCaptureDevice *captureDevice = [self.captureDeviceInput device];
 NSError *error;
 //注意改变设备属性前一定要首先调用lockForConfiguration:调用完之后使用unlockForConfiguration方法解锁
 if ([captureDevice lockForConfiguration:&error]) {
  propertyChange(captureDevice);
  [captureDevice unlockForConfiguration];

 }else {
  NSLog(@"设置设备属性过程发生错误,错误信息:%@", error.localizedDescription);
 }
}

//设置闪光灯模式
- (void)setFlashMode:(AVCaptureFlashMode)flashMode
{
 [self changeDeviceProperty:^(AVCaptureDevice *captureDevice) {
  if ([captureDevice isFlashModeSupported:flashMode]) {
   [captureDevice setFlashMode:flashMode];
  }
 }];
}

//设置聚焦模式
- (void)setFocusMode:(AVCaptureFocusMode)focusMode
{
 [self changeDeviceProperty:^(AVCaptureDevice *captureDevice) {
  if ([captureDevice isFocusModeSupported:focusMode]) {
   [captureDevice setFocusMode:focusMode];
  }
 }];
}

//设置曝光模式
- (void)setExposureMode:(AVCaptureExposureMode)exposureMode
{
 [self changeDeviceProperty:^(AVCaptureDevice *captureDevice) {
  if ([captureDevice isExposureModeSupported:exposureMode]) {
   [captureDevice setExposureMode:exposureMode];
  }
 }];
}

//设置聚焦点
- (void)focusWithMode:(AVCaptureFocusMode)focusMode exposureMode:(AVCaptureExposureMode)exposureMode atPoint:(CGPoint)point
{
 [self changeDeviceProperty:^(AVCaptureDevice *captureDevice) {
  if ([captureDevice isFocusModeSupported:focusMode]) {
   [captureDevice setFocusMode:AVCaptureFocusModeAutoFocus];
  }
  if ([captureDevice isFocusPointOfInterestSupported]) {
   [captureDevice setFocusPointOfInterest:point];
  }
  if ([captureDevice isExposureModeSupported:exposureMode]) {
   [captureDevice setExposureMode:AVCaptureExposureModeAutoExpose];
  }
  if ([captureDevice isExposurePointOfInterestSupported]) {
   [captureDevice setExposurePointOfInterest:point];
  }
 }];
}

//添加点按手势,点按时聚焦
- (void)addGenstureRecognizer
{
 [self.containerView addGestureRecognizer:[[UITapGestureRecognizer alloc] initWithTarget:self action:@selector(tapScreen:)]];
}

- (void)tapScreen:(UITapGestureRecognizer *)tapGesture
{
 CGPoint point = [tapGesture locationInView:self.containerView];
 //将UI坐标转化为摄像头坐标
 CGPoint cameraPoint = [self.captureVideoPreviewLayer captureDevicePointOfInterestForPoint:point];
 [self setFocusCursorWithPoint:point];
 [self focusWithMode:AVCaptureFocusModeAutoFocus exposureMode:AVCaptureExposureModeAutoExpose atPoint:cameraPoint];
}

//设置聚焦光标位置
- (void)setFocusCursorWithPoint:(CGPoint)point
{
 self.focusCursor.center = point;
 self.focusCursor.transform = CGAffineTransformMakeScale(1.5, 1.5);
 self.focusCursor.alpha = 1.0;
 [UIView animateWithDuration:1.0 animations:^{
  self.focusCursor.transform = CGAffineTransformIdentity;
 } completion:^(BOOL finished) {
  self.focusCursor.alpha = 0;
 }];
}

- (void)dealloc
{
 [self removeNotification];
}

@end
Demo下载链接
以上就是本文的全部内容,希望对大家的学习有所帮助,也希望大家多多支持脚本之家。
 登录查看全部
参与评论
手机查看
返回顶部